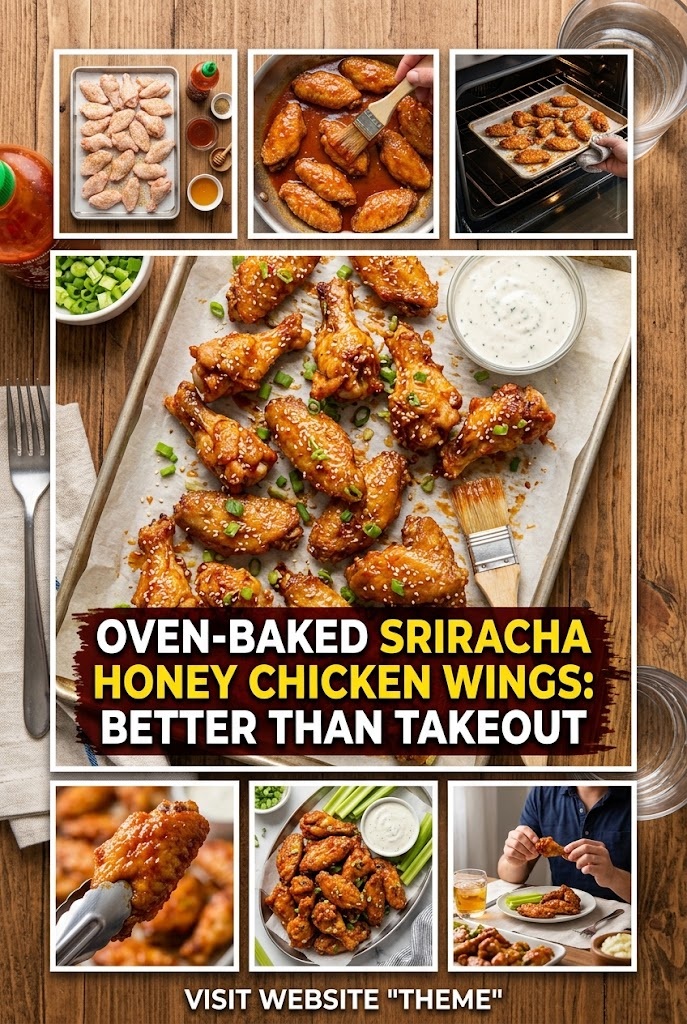
Oven-Baked Sriracha Honey Chicken Wings: Better Than Takeout
The search for the perfect chicken wing is a journey every home cook embarks upon at some point. We’ve all been there: staring at a menu of a local sports bar or a high-end gastropub, wondering how they achieve that elusive combination of a shatteringly crisp exterior and a succulent, juice-filled interior. For years, the consensus was that you had to deep-fry wings in gallons of bubbling oil to reach that level of perfection. But what if the secret to the ultimate wing wasn’t found in a vat of grease, but in your own oven?
Enter the Oven-Baked Sriracha Honey Chicken Wing. This isn’t just a healthier alternative to the deep-fried classic; it is a superior version. By harnessing the power of a specific chemical reaction and the balanced harmony of heat and sweet, you can produce wings that outshine any takeout order. In this comprehensive guide, we will break down the science of the crunch, the art of the glaze, and the techniques that will make you the undisputed wing champion of your neighborhood.
The Science of the Crunch: Why Baking Powder is a Game Changer
Before we get into the sauce, we must address the most important element of a chicken wing: the skin. If the skin isn’t crispy, the wing has failed. In a deep fryer, the high heat evaporates moisture instantly. In an oven, moisture often gets trapped, leading to rubbery, unappealing skin.
The secret weapon used by professional chefs and food scientists alike is aluminum-free baking powder. This isn’t just a random pantry addition; it’s a chemical necessity for oven-baking.
How Baking Powder Works on Chicken Skin
Baking powder is a leavening agent that consists of a base (sodium bicarbonate) and an acid. When applied to chicken skin, it raises the pH level of the skin. This higher pH environment allows the proteins to break down more efficiently, leading to a texture that is crispier and more browned.
Furthermore, the baking powder reacts with the natural juices of the chicken to create tiny carbon dioxide bubbles. These bubbles increase the surface area of the skin, creating those craggy, crunchy bits that trap sauce and provide that satisfying “crunch” sound when you take a bite.
The Drying Process
To achieve the “Better Than Takeout” status, you must ensure your wings are as dry as possible before they even touch the baking powder. Moisture is the enemy of crispiness.
- Patting Dry: Use paper towels to vigorously pat down every single wing.
- Air-Chilling: If you have the time, place your seasoned wings on a wire rack in the refrigerator for 4 to 24 hours. This dehydrates the skin, ensuring that once they hit the heat, the fat renders out immediately rather than steaming the meat.
The Flavor Profile: The Harmony of Sriracha and Honey
The “Sriracha Honey” glaze is a modern classic for a reason. It hits every part of the palate: spicy, sweet, salty, and acidic.
Sriracha: The Global Icon
Sriracha, often referred to as “Rooster Sauce,” originated in Thailand but became a staple of American cuisine thanks to Huy Fong Foods. It is made from sun-ripened chili peppers, vinegar, garlic, sugar, and salt. Its heat is approachable—hot enough to give a kick, but not so intense that it masks the flavor of the chicken.
Honey: Nature’s Emulsifier
Honey does more than just sweeten the sauce. It provides a viscous body that helps the glaze cling to the wings. When honey is heated, it undergoes caramelization, adding deep, nutty notes that complement the fermented garlic flavors in the Sriracha.
The Balancing Act
A perfect sauce is about balance.
- Acid: We add a splash of rice vinegar or lime juice to cut through the richness of the honey and the fat of the chicken.
- Umami: A dash of soy sauce or tamari adds a savory depth that makes the wings addictive.
- Aromatics: Freshly grated ginger and minced garlic elevate the sauce from a simple condiment to a gourmet glaze.
Ingredients: Everything You Need
To make approximately 3 pounds of wings (enough for 4 hungry people), you will need the following high-quality ingredients:
For the Wings:
- 3 lbs Chicken Wings: Preferably a mix of “flats” and “drums.” Ensure they are “party style” (separated at the joint).
- 1 tbsp Aluminum-Free Baking Powder: Essential for the crunch. Do not use baking soda!
- 1 tsp Kosher Salt: To draw out moisture and season the meat.
- 1/2 tsp Black Pepper: For a foundational spice.
- 1/2 tsp Garlic Powder: To build flavor into the skin itself.
For the Sriracha Honey Glaze:
- 1/3 cup Sriracha: Adjust based on your heat tolerance.
- 1/3 cup High-Quality Honey: Clover or wildflower honey works best.
- 2 tbsp Unsalted Butter: This gives the sauce a velvety, “restaurant-style” finish.
- 1 tbsp Soy Sauce: For that essential umami hit.
- 1 tsp Rice Vinegar: To provide the necessary acidity.
- 1 tsp Freshly Grated Ginger: For a bright, zingy kick.
- 2 cloves Garlic: Minced very finely or pressed.
For Garnish (Optional but Recommended):
- Toasted Sesame Seeds: For texture and visual appeal.
- Sliced Green Onions: To provide a fresh, sharp contrast.
- Fresh Cilantro: For an herbal finish.
Step-by-Step Instructions for Perfection
Step 1: Prep and Dry the Wings
Start by preheating your oven to 425°F (220°C). While the oven heats, take your wings out of the packaging. Using a generous amount of paper towels, pat them dry until no moisture remains on the surface.
In a large bowl, toss the wings with the baking powder, salt, pepper, and garlic powder. Ensure every wing is lightly and evenly coated. The wings should look slightly dusty, not caked in powder.
Step 2: The Wire Rack Method
This is a non-negotiable step for crispy oven wings. Do not place the wings directly on a baking sheet. Instead, place a wire cooling rack inside a large rimmed baking sheet. Line the baking sheet with aluminum foil for easy cleanup.
Arrange the wings on the rack in a single layer, ensuring they are not touching. Air needs to circulate around the entire wing to crisp the bottom just as well as the top.
Step 3: The Initial Bake
Place the wings in the center of the oven. Bake for 20 minutes. At the 20-minute mark, remove the tray and use tongs to flip each wing. This ensures even fat rendering.
Return the wings to the oven for another 20 to 25 minutes. You are looking for a deep golden-brown color and a skin that looks visibly tight and crispy. If you have a convection setting on your oven, use it—it will speed up the process and enhance the crunch.
Step 4: Preparing the Sriracha Honey Glaze
While the wings are finishing their bake, prepare the sauce. In a small saucepan over medium-low heat, melt the butter. Add the minced garlic and grated ginger, sautéing for about 1 minute until fragrant but not browned.
Whisk in the Sriracha, honey, soy sauce, and rice vinegar. Bring the mixture to a very gentle simmer. Let it cook for 3-5 minutes, stirring frequently. The sauce should thicken slightly and become glossy. Remove from heat and set aside.
Step 5: The Toss
Once the wings are done, remove them from the oven. Let them rest on the wire rack for just 2 minutes—this allows the internal juices to redistribute while the skin stays crisp.
Place the wings in a large, clean stainless steel bowl. Pour the warm Sriracha Honey glaze over the wings. Use a large spoon or your “chef toss” skills to coat every wing thoroughly. The heat from the wings will slightly “set” the glaze, making it sticky and irresistible.
Step 6: The Final Touch
Transfer the glazed wings to a serving platter. Immediately sprinkle with toasted sesame seeds and sliced green onions. Serve hot.
Pro-Tips for the Ultimate Wing Experience
1. Don’t Crowd the Pan
If you are making a large batch, use two separate baking sheets. If the wings are too close together, they will create steam, which will lead to soggy skin. Space is the key to a professional-grade crunch.
2. Room Temperature Wings
If possible, take your wings out of the fridge 20 minutes before seasoning. This takes the chill off the meat, allowing it to cook more evenly in the oven.
3. Adjusting the Heat
If you find Sriracha too spicy, increase the honey or add a tablespoon of brown sugar. If you want more “punch,” add a teaspoon of red chili flakes or a dash of cayenne pepper to the sauce.
4. The “Double Bake” Trick
For wings that stay crispy even after being tossed in sauce, you can return the sauced wings to the oven for 3-5 minutes. This “bakes in” the sauce, creating a tacky, caramelized coating that is popular in many high-end wing spots.
Nutritional Comparison: Baked vs. Fried
One of the biggest advantages of this recipe is the health profile. Traditional deep-fried wings are submerged in trans-fats and saturated oils. A typical order of 10 fried wings can contain upwards of 1,000 calories and 80 grams of fat before the sauce is even added.
By baking the wings on a rack, you are actually removing fat. As the wings cook, the natural fat under the chicken skin renders out and drips onto the tray below. You get all the flavor of the chicken and all the crunch of the skin with significantly fewer calories and no inflammatory seed oils.
Frequently Asked Questions
Can I use an Air Fryer?
Absolutely. The air fryer is essentially a high-powered convection oven. To use an air fryer, follow the same prep steps (dry wings, baking powder coating). Cook at 400°F (200°C) for 15-20 minutes, shaking the basket halfway through. The results will be incredibly crispy.
Why are my wings salty?
Baking powder can sometimes have a metallic or salty taste if you use too much. Ensure you are using exactly 1 tablespoon for 3 pounds of wings, and always use aluminum-free baking powder to avoid a bitter aftertaste.
Can I make these wings ahead of time?
Wings are always best served fresh. However, you can do the “initial bake” ahead of time. Bake them until they are just golden, let them cool, and refrigerate. When you’re ready to serve, blast them in a 450°F oven for 5-8 minutes to re-crisp them, then toss in the sauce.
What should I serve with Sriracha Honey wings?
Because these wings have a bold, Asian-inspired flavor profile, they pair beautifully with:
- Cooling Dip: A lime-infused Greek yogurt dip or a classic Wasabi ranch.
- Sides: A crisp cucumber salad with rice vinegar dressing, or a cold noodle salad.
- Vegetables: Classic celery and carrot sticks, or charred bok choy.
Variations on the Theme
Once you master the baking powder technique and the base glaze, the possibilities are endless.
The “Honey Garlic” Variation
Omit the Sriracha and triple the amount of garlic. Add a tablespoon of oyster sauce for a deep, savory, non-spicy alternative that kids will love.
The “Korean Fusion” Wing
Replace the Sriracha with Gochujang (Korean chili paste). This creates a thicker, funkier, and slightly more pungent sauce that is currently taking the culinary world by storm.
The “Hot Honey” Wing
Use a spicy honey (infused with habaneros) and combine it with melted butter and a splash of apple cider vinegar. This creates a simpler, more Americana-style wing with a modern spicy twist.
The Cultural Impact of the Chicken Wing
It’s worth noting how the chicken wing transformed from a “throwaway” cut to a culinary icon. Originally, wings were used primarily for making chicken stock. It wasn’t until 1964 at the Anchor Bar in Buffalo, New York, that the modern concept of the “Buffalo Wing” was born.
Since then, the wing has become a symbol of American social gathering. Whether it’s the Super Bowl, a backyard BBQ, or a Friday night in, wings represent community and shared enjoyment. The Sriracha Honey variation represents the “Third Wave” of wing evolution—moving away from the vinegar-heavy Buffalo sauce toward more complex, global flavor profiles that reflect the diverse palate of the modern American diner.
Why Homemade is Truly “Better Than Takeout”
Takeout wings suffer from one fatal flaw: the “Soggy Box” syndrome. From the moment the wings are sauced and placed in a cardboard container, the steam begins to soften the skin. By the time the delivery driver reaches your door, that crispy wing has become a shadow of its former self.
When you make these wings at home, you control the timing. You can move the wings from the oven to the sauce to the plate in under 60 seconds. You are eating the wing at its absolute peak of texture and temperature. Furthermore, you have control over the quality of the chicken. You can opt for organic, pasture-raised wings that have a much deeper flavor than the mass-produced chicken used in most commercial kitchens.
Troubleshooting Common Issues
My wings aren’t getting crispy.
- Check your oven temperature with an external thermometer; many ovens run cold.
- Ensure you didn’t use baking soda by mistake.
- Make sure you didn’t skip the drying process with paper towels.
The sauce is too thin.
- If your sauce isn’t clinging to the wings, simmer it for a few more minutes to reduce the water content in the honey and Sriracha.
- Adding a cold pat of butter at the very end (the “mounting” technique) helps create a thicker, glossier emulsion.
The sauce is too salty.
- Check your soy sauce. If you used “Dark Soy Sauce” instead of “Light” or “All-Purpose,” the salt content will be much higher. Use a low-sodium soy sauce if you are sensitive to salt.
Final Thoughts: The Perfect Game Day Companion
These Oven-Baked Sriracha Honey Chicken Wings are a testament to the fact that you don’t need a deep fryer to achieve restaurant-quality results. With a little bit of science (the baking powder), a little bit of patience (the wire rack), and a perfectly balanced sauce, you can create a meal that is healthy, cost-effective, and undeniably delicious.
Whether you’re hosting a crowd for the big game or just looking for a Friday night treat, this recipe is a guaranteed winner. The sticky, sweet, and spicy glaze combined with the crunch of the perfectly baked skin will have everyone reaching for seconds. Forget the delivery app—the best wings in town are now coming out of your oven.
Recipe Summary Table
| Step | Action | Key Detail |
|---|---|---|
| 1 | Prep | Dry wings thoroughly with paper towels. |
| 2 | Coating | Toss with baking powder, salt, and garlic powder. |
| 3 | Setup | Use a wire rack over a foil-lined baking sheet. |
| 4 | Bake | 425°F for 45-50 minutes, flipping halfway. |
| 5 | Sauce | Simmer Sriracha, honey, butter, garlic, and ginger. |
| 6 | Finish | Toss wings in sauce and garnish with sesame seeds. |
Enjoy the process, experiment with the heat levels, and most importantly, enjoy the crunch! These wings aren’t just a recipe; they’re a technique that will change the way you cook chicken forever.